After your first installation, you should make MUST have settings.
First of all, go to Settings – General and enable option for open registration. Enable it if you need to have multi-user site
Next important setting is permalinks. We recommend next permalinks
Resave permalinks. Ok. It’s enough. Now, you can customize size of site, logo, colors and editing your homepage. You can do this in Theme option or directly on your site from Customizer. Check our video
And don’t forget to change your logos in theme option – logo option and Theme option – Mobile and AMP settings
Go to pages – all pages and find your Homepage. Click to Edit in Elementor
it can be hard to edit some elements because they can be over other elements. It’s because Elementor has unlimited number of layers. You can simply click with right click and get access to Navigator. Then, you can choose any element and edit it.
If you want to edit background images and colors, you can do this by editing section (sometimes column) background. Background option is available in Style tab
You can find how to work with Elementor and how to change basic colors from Customizer in our video
Please, don’t forget to setup woocommerce and vendor plugin. Make sure that you didn’t skip setup wizards for woocommerce. Check next documentations for first basic setups and color changes on site
Woocommerce options
Next step is setup of woocommerce. You must install woocommerce before installing our demo.
Don’t skip woocommerce setup wizard, because you will lose woocommerce pages which must be installed. If you missed them, follow next guideline to install them. Make sure that you have My account page and it’s working correctly.
Now, find your My account page. You will need link on this page. Usually, it’s /my-account. You can find your My account page in Pages – All pages
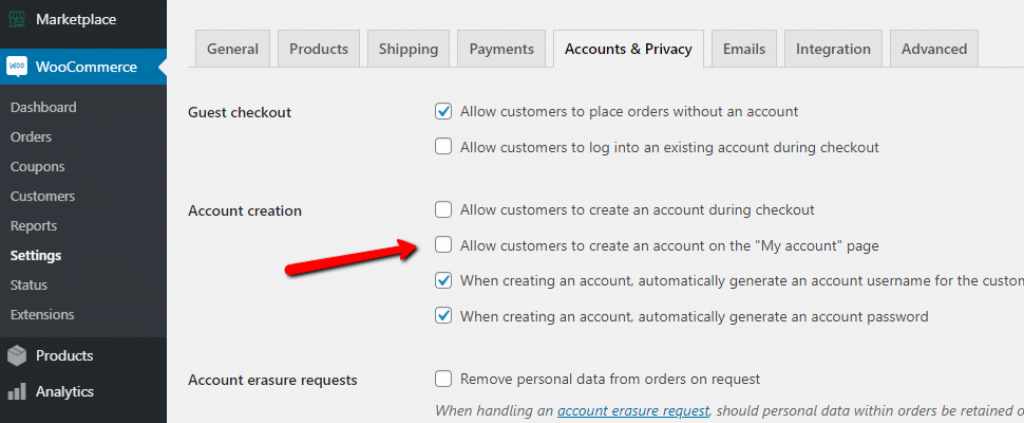
My account is page where users can login. It’s also page where users can see their orders (if you have shop on site). We will use this page for registration. For this, enable next option in Woocommerce settings
When user registers on site, he will find link to register as vendor
Copy link to My account page and insert in Theme option – User Option – Custom Register Link.
Some vendor plugins use My account page for vendor registration. Dor example, Dokan plugin can do this. But some plugins require to have separate page for vendor registration. Anyway, check documentation of vendor plugin if you want to allow users to register as vendors on your site. Copy link to page which you want to use as registration page and place it in u003cstrongu003eu003cemu003eTheme option – user option – custom register linku003c/emu003eu003c/strongu003e
Also, we recommend to edit your My account and vendor registration page and set page layout as System pages
Last part is Woocommerce images and shop layouts. Open your site page (any page), click on Customizer link in top bar
Then go to Woocommerce options – Product images and disable CROP. Or set own ratio for images. Also, you can choose other parameters in customizer
Our theme has extended product layouts for single pages and archives. We recommend to check video how to use them
Multivendor options
If you want to allow other users to sell or post something on your site, you will need multivendor plugin for woocommerce. We support several plugins and theme has more extended integration in these plugins. You can check our comparison of vendor plugins
Each vendor plugin has own pros and conses, but all of them are doing their job well. When you activate vendor plugin, don’t skip setup wizard as it’s important to set initial values and pages. We also added some more tutorials how to use theme with vendor plugins to make marketplace on wordpress
Additional resources
By default, wordpress has no seo and cache settings, so, you must install caching system and seo plugin